These are so incredibly easy to make. You will laugh when you see one's in the store and they charge a ton of money for them, because...they are SO easy to make!!!
Ingredients:
Strawberries (a tub of them)
3/4 Bag of chocolate chips (white or brown chocolate)
1/4 Bag of chocolate chips (opposite color as the one above)
OR instead of the second kind of chocolate, you can do sprinkles
Directions:
*Cut all the stems out of your strawberries
*In a microwave safe bowl, place your 3/4 bag of chocolate chips.
*Microwave for 20 seconds. Stir well.
*Microwave for another 20 seconds. Stir well again. Repeat this about 3-4 times until the chocolate is well melted. Make sure to stir often because chocolate that is not stirred often will burn really easy when in the microwave.
*Once it is all melted, set onto the table or counter where you will be making your strawberries.
*Line a baking sheet with parchment (or waxed) paper.
*Dip a strawberry into the chocolate about 3/4 of the way up the strawberry. Lay it onto the baking sheet. I often do a quick flip of the strawberry so the bit of chocolate that drips gets put underneath the berry.
*Coat all of your berries, then do this next step.
*In a microwave safe coffee cup, put a ziplock bag. Now put your second color of chocolate chips into the bag.
*Microwave for 20 seconds, stir, 20 more seconds, stir, etc... If you are doing white chocolate for this second step, it often takes white chocolate a bit longer to melt than semi-sweet chocolate does. Not quite sure why...
*Once the chips are melted, seal the baggie.
*Cut a small tip off the baggie with scissors.
*Start drizzling your chocolate over the berries in a fun design.
Leave on the baking sheet until dry. I don't put them in the fridge because I find once you pull them from the fridge the chocolate starts to unmelt a bit... It takes about 2-3 hours for them to fully dry. They are so good too! I often put what is leftover from baggie of melted chocolate into the tops of the strawberries where the hull was. Hull? Um, strawberry green stemy thing... Yum!
Saturday, January 7, 2012
Thursday, January 5, 2012
Italian Chicken Soup
Here is a recipe by the Pioneer Woman that we really liked! I found it online and made it soon after. Of course, a few of the ingredients have been changed up a bit... It is also a bit time consuming, but it makes a TON of soup so it will last a few lunches and/or dinners. Totally worth trying it! Enjoy!
Ingredients:
3/4 Box of SMALL noodles (any shape). I used Mini Piccolini by Barilla)
1 Tbsp olive oil
4 Large chicken breasts
8 Cups chicken broth (low sodium)
3/4 Medium onion
1-2 Green peppers (I used just shy of 2 full one's because I love green peppers)
2 Stalks of celery
1 Tbsp oil (I separated the oil by order of when you need it in the directions...)
28 Ounces of diced tomatoes, undrained
1 1/2 - 2 Cups heavy cream
1/3 Cup extra virgin olive oil
2-3 Tbsp's dried oregano (super important spice, cannot leave this one out)
Salt and pepper to taste (just add it at the end)
Parmesan cheese for serving on top...and crusty bread!
Directions:
*Cook your pasta in a large pot according to the packaging directions. I just boiled the water with some salt, can't go wrong... Be careful not to overcook though!
*Remove the pasta and rinse under cold water. Drain. Then toss the pasta with 1 Tbsp oil. Set aside.
*Put your chicken breasts, uncooked, into the large skillet pot (without the pasta...). Pour the chicken stock over the chicken.
*Bring chicken stock and chicken breasts to a boil. Once it is boiling, turn it all the way and simmer the chicken (cook on really low heat) for 30 minutes, covered.
*Dice up all of your celery stalks, onion, and green pepper.
*After simmering for 30 minutes, turn off the heat. Leave chicken in the pot, still covered with a lid, for another 30 minutes. Hey, I told you it takes a bit of time to make this thing...but it is well worth it in the end! Homemade soup is amazing...
*After these 30 minutes, remove the chicken and shred it. You should be able to take two forks and just pull it all apart. Put the chicken back into the pot with the chicken juice/broth.
*Heat 1 Tablespoon of olive oil in a small pan. Add the oregano and then turn off the heat. Stir constantly for about 1-2 minutes to make sure it doesn't burn. Set aside...and sorry for all these dishes. :)
*Another skillet please. Okay, put your onions, celery, peppers, and 1 Tbsp oil into the skillet/pan. Cook these on medium heat for about 10 minutes. Stir often so they do not burn. Once done, pour into the pot with the shredded chicken and chicken juice.
*Pour the tomatoes and their juice (so undrained tomatoes) into the chicken broth mixture. Now add the oregano mixture (I left out a little bit because the smell was SO strong, I didn't want the soup to be all oregano).
*Pour the cooked pasta into the soup mixture. Add the cream and the olive oil. Stir well.
*Bring mixture to a boil. Once it is boiling, turn it off.
*Serve soup with LOTS of Parmesan cheese on the top. If you have crusty bread, serve that with it. Its delicious when the bread soaks up the oil at the top of the soup, oh my! :)
3/4 Box of SMALL noodles (any shape). I used Mini Piccolini by Barilla)
1 Tbsp olive oil
4 Large chicken breasts
8 Cups chicken broth (low sodium)
3/4 Medium onion
1-2 Green peppers (I used just shy of 2 full one's because I love green peppers)
2 Stalks of celery
1 Tbsp oil (I separated the oil by order of when you need it in the directions...)
28 Ounces of diced tomatoes, undrained
1 1/2 - 2 Cups heavy cream
1/3 Cup extra virgin olive oil
2-3 Tbsp's dried oregano (super important spice, cannot leave this one out)
Salt and pepper to taste (just add it at the end)
Parmesan cheese for serving on top...and crusty bread!
Directions:
*Cook your pasta in a large pot according to the packaging directions. I just boiled the water with some salt, can't go wrong... Be careful not to overcook though!
*Remove the pasta and rinse under cold water. Drain. Then toss the pasta with 1 Tbsp oil. Set aside.
*Put your chicken breasts, uncooked, into the large skillet pot (without the pasta...). Pour the chicken stock over the chicken.
*Bring chicken stock and chicken breasts to a boil. Once it is boiling, turn it all the way and simmer the chicken (cook on really low heat) for 30 minutes, covered.
*Dice up all of your celery stalks, onion, and green pepper.
*After simmering for 30 minutes, turn off the heat. Leave chicken in the pot, still covered with a lid, for another 30 minutes. Hey, I told you it takes a bit of time to make this thing...but it is well worth it in the end! Homemade soup is amazing...
*After these 30 minutes, remove the chicken and shred it. You should be able to take two forks and just pull it all apart. Put the chicken back into the pot with the chicken juice/broth.
*Heat 1 Tablespoon of olive oil in a small pan. Add the oregano and then turn off the heat. Stir constantly for about 1-2 minutes to make sure it doesn't burn. Set aside...and sorry for all these dishes. :)
*Another skillet please. Okay, put your onions, celery, peppers, and 1 Tbsp oil into the skillet/pan. Cook these on medium heat for about 10 minutes. Stir often so they do not burn. Once done, pour into the pot with the shredded chicken and chicken juice.
*Pour the tomatoes and their juice (so undrained tomatoes) into the chicken broth mixture. Now add the oregano mixture (I left out a little bit because the smell was SO strong, I didn't want the soup to be all oregano).
*Pour the cooked pasta into the soup mixture. Add the cream and the olive oil. Stir well.
*Bring mixture to a boil. Once it is boiling, turn it off.
*Serve soup with LOTS of Parmesan cheese on the top. If you have crusty bread, serve that with it. Its delicious when the bread soaks up the oil at the top of the soup, oh my! :)
Wednesday, January 4, 2012
:(
I'm sorry I haven't posted in forever! I promise to hurry and start posting again soon. I HAVE been cooking...but it is either recipes I have been asked not to share or it is recipes that I don't think are very good and wouldn't recommend ya'll trying! Stay with me, I'll be posting again soon!
Monday, December 12, 2011
Taco Cornbread Bake
My friend Misty made this recipe and said how yummy it was on her facebook wall. Of course, I had to google it and look it up. HOLY yum! We had it for dinner tonight and really liked it! The cornbread topping was awesome because it was a sweet flavor on top of the spicy mexican under layers. Loved this one!
Ingredients:
1 lb ground beef
1 Packet of taco seasoning
1/3 Cup water
1 Can of Rotel, drained
1 Can black beans, drained and rinsed
1 Can corn, drained
1 Box Jiffy cornbread (plus the ingredients called for on the package)
1 - 1 1/2 Cups shredded cheese
Salsa and sour cream to top it off
Directions:
*In a pan, cook your ground beef on top of the stove. Then drain the juices/fat out.
*Put your taco seasoning and water into the cooked and drained beef. Stir well. Simmer/cook for 2-3 minutes.
*Pour your beans, Rotel, and corn into the ground beef mixture. Stir it up well.
*Add half of your cheese to the meat mixture. Stir it up.
*Spray a square baking dish down with cooking spray.
*Turn your oven on to 400*F.
*Make your Jiffy according to the package. (Mine called for one egg and 1/3 a cup of water. I let it sit a couple of minutes, then stirred it up again.)
*Pour your meat mixture into the baking dish. Pour the cornbread on top of the meat mixture.
*Place dish into your oven and bake for 20 minutes.
*After the 20 minutes, pull it out and top it with the remaining cheese.
*Put back in the oven for 2-4 minutes until the cheese has melted.
Be careful, it is really really hot to the touch when it comes out of the oven! Top it with sour cream and salsa. Enjoy!
Ingredients:
1 lb ground beef
1 Packet of taco seasoning
1/3 Cup water
1 Can of Rotel, drained
1 Can black beans, drained and rinsed
1 Can corn, drained
1 Box Jiffy cornbread (plus the ingredients called for on the package)
1 - 1 1/2 Cups shredded cheese
Salsa and sour cream to top it off
Directions:
*In a pan, cook your ground beef on top of the stove. Then drain the juices/fat out.
*Put your taco seasoning and water into the cooked and drained beef. Stir well. Simmer/cook for 2-3 minutes.
*Pour your beans, Rotel, and corn into the ground beef mixture. Stir it up well.
*Add half of your cheese to the meat mixture. Stir it up.
*Spray a square baking dish down with cooking spray.
*Turn your oven on to 400*F.
*Make your Jiffy according to the package. (Mine called for one egg and 1/3 a cup of water. I let it sit a couple of minutes, then stirred it up again.)
*Pour your meat mixture into the baking dish. Pour the cornbread on top of the meat mixture.
*Place dish into your oven and bake for 20 minutes.
*After the 20 minutes, pull it out and top it with the remaining cheese.
*Put back in the oven for 2-4 minutes until the cheese has melted.
Be careful, it is really really hot to the touch when it comes out of the oven! Top it with sour cream and salsa. Enjoy!
Saturday, December 10, 2011
Brown Sugar Cookies
I'm a plain cookie fan. I am! I am not one to go crazy for loads of sweetness or chunks of anything in my cookies. This one is from Crico. I like them!
Ingredients:
1/2 Cup Crisco
1/2 Cup butter, softened
1 1/4 firmly packed brown sugar
1 Large egg
1 teaspoon vanilla extract
2 Cups flour
1/2 teaspoon baking soda
1/4 teaspoon salt
Directions:
*Heat oven to 350*F.
*Mix together the shortening, butter, brown sugar, egg, and vanilla extract.
*Once the ingredients are light and fluffy, add the flour, baking soda and salt. Mix well.
*Shape the dough into one inch balls. I put mine into those fun shaped cookie pans and they took the shape pretty well. Next time when it is not a holiday I will do the balls however!
*Place the balls onto an ungreased cookie sheet or onto parchment paper (I greased the pan I used...oops).
*Bake for 12-14 minutes. Remove pan from the oven and let sit for a couple of minutes before transferring the cookies to a cooling rack.
Ingredients:
1/2 Cup Crisco
1/2 Cup butter, softened
1 1/4 firmly packed brown sugar
1 Large egg
1 teaspoon vanilla extract
2 Cups flour
1/2 teaspoon baking soda
1/4 teaspoon salt
Directions:
*Heat oven to 350*F.
*Mix together the shortening, butter, brown sugar, egg, and vanilla extract.
*Once the ingredients are light and fluffy, add the flour, baking soda and salt. Mix well.
*Shape the dough into one inch balls. I put mine into those fun shaped cookie pans and they took the shape pretty well. Next time when it is not a holiday I will do the balls however!
*Place the balls onto an ungreased cookie sheet or onto parchment paper (I greased the pan I used...oops).
*Bake for 12-14 minutes. Remove pan from the oven and let sit for a couple of minutes before transferring the cookies to a cooling rack.
Almond Cookies
These are called Swedish Heirloom Cookies in the cookbook my Mom got them out of. The problem with naming cookies names like that though, is you are always questioning which cookie they are because you remember them as "the one's with the almonds in them." These are a thick dense cookie that doesn't expand much when cooking. They are easy to make and I like them because they aren't one of those cookies you will eat a million of them. One and you are totally satisfied!
Ingredients:
1/2 Cup shortening (like crisco)
1/2 Cup butter, soft
1 Cup powdered sugar
1/2 teaspoon salt
2 Cups flour
1 Tablespoon water
1 Tablespoon vanilla extract
1 1/4 Cups chopped up almonds (buy the sliced one's then cut them up a bit more)
Additional powdered sugar
Directions:
* Put the butter and shortening into a large bowl and mix until fluffy...(ours didn't get fluffy but we mixed it for about 2 good minutes on a medium speed on the mixer).
*Add the salt and powdered sugar. Mix on low speed until well blended.
*Still mixing on slow speed, add the flour.
*Add the water, vanilla, and almonds. Continue to mix until everything is well mixed.
*Shape the dough into one inch balls. I use an ice cream scoop because its always the perfect little ball size.
*Place on parchment paper lined baking sheet.
*Use a fork to flatten them down a bit.
*Bake at 325*F for 12-15 minutes. (Bake until well firmed or lightly browned)
*Coat the cookies in additional powdered sugar if you would like!
Ingredients:
1/2 Cup shortening (like crisco)
1/2 Cup butter, soft
1 Cup powdered sugar
1/2 teaspoon salt
2 Cups flour
1 Tablespoon water
1 Tablespoon vanilla extract
1 1/4 Cups chopped up almonds (buy the sliced one's then cut them up a bit more)
Additional powdered sugar
Directions:
* Put the butter and shortening into a large bowl and mix until fluffy...(ours didn't get fluffy but we mixed it for about 2 good minutes on a medium speed on the mixer).
*Add the salt and powdered sugar. Mix on low speed until well blended.
*Still mixing on slow speed, add the flour.
*Add the water, vanilla, and almonds. Continue to mix until everything is well mixed.
*Shape the dough into one inch balls. I use an ice cream scoop because its always the perfect little ball size.
*Place on parchment paper lined baking sheet.
*Use a fork to flatten them down a bit.
*Bake at 325*F for 12-15 minutes. (Bake until well firmed or lightly browned)
*Coat the cookies in additional powdered sugar if you would like!
Santa Cookies
Its that time of year again: Christmas Season! I love love love the holidays. I must admit though, its a little more stressful now that I have kids. I've been doing so much and finally had a chance to get some baking done. Here are a bunch of the cookies my Mom and I made today. Hope you like them!
Ingredients:
2 Boxes of Red Velvet cake mix (If you can find one with pudding inside, I couldn't)
2 Eggs
1 3/4 Sticks of butter, melted
1/4 Cup water
2- 3 Cups white chocolate chips (do to your liking)
Directions:
*Mix the first 4 ingredients together until well blended. (Mine was SO thick I had a HECK of a time mixing it! Almost to the point I almost through the batter out haha!)
*Add the white chocolate chips and stir well.
*Spray down a baking sheet with baking spray, or line the baking sheet with parchment paper.
*Pre-heat your oven to 375*F.
*Drop the dough by tablespoons onto your baking sheet. They really spread out so be careful not to put them too close together.
*Bake for 9-11 minutes. I only needed 9 minutes, but all of our stoves are different!
*Let sit on the baking sheet for about 5 minutes before moving them to a cooling rack.
Ingredients:
2 Boxes of Red Velvet cake mix (If you can find one with pudding inside, I couldn't)
2 Eggs
1 3/4 Sticks of butter, melted
1/4 Cup water
2- 3 Cups white chocolate chips (do to your liking)
Directions:
*Mix the first 4 ingredients together until well blended. (Mine was SO thick I had a HECK of a time mixing it! Almost to the point I almost through the batter out haha!)
*Add the white chocolate chips and stir well.
*Spray down a baking sheet with baking spray, or line the baking sheet with parchment paper.
*Pre-heat your oven to 375*F.
*Drop the dough by tablespoons onto your baking sheet. They really spread out so be careful not to put them too close together.
*Bake for 9-11 minutes. I only needed 9 minutes, but all of our stoves are different!
*Let sit on the baking sheet for about 5 minutes before moving them to a cooling rack.
Wednesday, December 7, 2011
Burrito Bowl
The other night I was dying for some Chipotle Mexican food... This was easy and I'm sure any of you would have come up with it on your own. BUT, I feel guilty for not posting in so long so I will just go ahead and post this so you don't all feel left out! Oh, and 1500 views on the blog isn't too shabby! Thanks guys!
Ingredients:
2 Cups fast cooking white rice
1 Cup frozen rice
1 Can black beans
2 Chicken breasts
1/2 Cup shredded cheese
1/4 Cup sour cream
1/4 Cup salsa
Dash of lime juice (if you have it)
Dash of salt
Directions:
*In a pot, cook your instant cook white rice. You can make more or less than the 2 cups if you want...
*Cut your chicken in halves. Put into a skillet with a drop or two of oil. Turn onto medium heat.
*Open your can of black beans and rinse them all off. Put into a bowl and microwave them, or put them into a pot and cook with a drop of water (so they don't burn). Just heat them up however you want.
*Cook the corn however you want too, pot or dish...
*Cook your chicken through. Once it is fully cooked pull it out. Take two forks and shred it by pulling it apart. Put back into the skillet onto low heat to keep it warm.
*If you want to add some lime juice and salt to your rice you can (chipotle and Qdoba use this in their rice...along with cilantro, but I didn't have any of that!)
*Put your rice on a plate. Put the chicken on top of the rice, then the corn, then black beans, salsa, cheese, and finally sour cream. YUMMY!
Ingredients:
2 Cups fast cooking white rice
1 Cup frozen rice
1 Can black beans
2 Chicken breasts
1/2 Cup shredded cheese
1/4 Cup sour cream
1/4 Cup salsa
Dash of lime juice (if you have it)
Dash of salt
Directions:
*In a pot, cook your instant cook white rice. You can make more or less than the 2 cups if you want...
*Cut your chicken in halves. Put into a skillet with a drop or two of oil. Turn onto medium heat.
*Open your can of black beans and rinse them all off. Put into a bowl and microwave them, or put them into a pot and cook with a drop of water (so they don't burn). Just heat them up however you want.
*Cook the corn however you want too, pot or dish...
*Cook your chicken through. Once it is fully cooked pull it out. Take two forks and shred it by pulling it apart. Put back into the skillet onto low heat to keep it warm.
*If you want to add some lime juice and salt to your rice you can (chipotle and Qdoba use this in their rice...along with cilantro, but I didn't have any of that!)
*Put your rice on a plate. Put the chicken on top of the rice, then the corn, then black beans, salsa, cheese, and finally sour cream. YUMMY!
Thursday, November 17, 2011
Jello Pretzel Salad
Another pinterest recipe that is OH SO GOOD! And easy :)
Ingredients:
1 Big box of strawberry or raspberry jello (we used sugar free)
10-12 Strawberries cut into smaller slivers
2 1/2 Cups chopped up pretzels (as small as you like)
1 1/2 Sticks butter, melted (I used 1 3/4 sticks)
4 Tablespoons brown sugar
1 Pkg cream cheese
1 Cup white sugar
1 Tub cool whip, thawed
Directions:
*Make the jello by boiling 2 cups of hot water. Mix the hot water with the jello for 2 minutes. Add the 2 cups of cold water (I filled a 2 cup measuring cup up with ice, then filled with water so it settled quicker). Mix well.
*Put the strawberry slices into the jello.
*Put strawberries and jello mixture into the fridge for about an hour to an hour and a half. You want it to be jiggly without being liquidy or a solid yet.
*When the jello is just about at that perfectly jiggly stage, start these next steps.
*Mix your crushed up pretzels, melted butter, and brown sugar together in a mixing bowl.
*Spray a 9x13 glass dish down with baking spray.
*Pre-heat your oven to 350*F.
*Pour the pretzel mixture into the baking dish and press it all down firmly. I made sure my edges weren't raised up with pretzel pieces too...just push those little pieces back down.
*Bake for 10 minutes.
*Remove from the oven and set aside until completely cooled (about 15-20 minutes).
*While the pretzels are cooling down, mix your cream cheese and 1 cup of white sugar together.
*Add the tub of cool whip to the sugar and cream cheese. Mix well.
*Once the pretzels are cooled, pour the cream cheese mixture over it. Make sure all the edges have the cream cheese mixture all the way to them. You don't want the next mixture of jello to seep down to the pretzels. So cover the pretzels well!
*Pour the jello mixture over the cream cheese. Even it out if need be.
*Put in fridge until jello has settled (about 2 more hours).
Original recipe from here: http://www.the-girl-who-ate-everything.com/2009/07/jello-pretzel-salad.html but ya'll know I changed it a bit :)
Ingredients:
1 Big box of strawberry or raspberry jello (we used sugar free)
10-12 Strawberries cut into smaller slivers
2 1/2 Cups chopped up pretzels (as small as you like)
1 1/2 Sticks butter, melted (I used 1 3/4 sticks)
4 Tablespoons brown sugar
1 Pkg cream cheese
1 Cup white sugar
1 Tub cool whip, thawed
Directions:
*Make the jello by boiling 2 cups of hot water. Mix the hot water with the jello for 2 minutes. Add the 2 cups of cold water (I filled a 2 cup measuring cup up with ice, then filled with water so it settled quicker). Mix well.
*Put the strawberry slices into the jello.
*Put strawberries and jello mixture into the fridge for about an hour to an hour and a half. You want it to be jiggly without being liquidy or a solid yet.
*When the jello is just about at that perfectly jiggly stage, start these next steps.
*Mix your crushed up pretzels, melted butter, and brown sugar together in a mixing bowl.
*Spray a 9x13 glass dish down with baking spray.
*Pre-heat your oven to 350*F.
*Pour the pretzel mixture into the baking dish and press it all down firmly. I made sure my edges weren't raised up with pretzel pieces too...just push those little pieces back down.
*Bake for 10 minutes.
*Remove from the oven and set aside until completely cooled (about 15-20 minutes).
*While the pretzels are cooling down, mix your cream cheese and 1 cup of white sugar together.
*Add the tub of cool whip to the sugar and cream cheese. Mix well.
*Once the pretzels are cooled, pour the cream cheese mixture over it. Make sure all the edges have the cream cheese mixture all the way to them. You don't want the next mixture of jello to seep down to the pretzels. So cover the pretzels well!
*Pour the jello mixture over the cream cheese. Even it out if need be.
*Put in fridge until jello has settled (about 2 more hours).
Original recipe from here: http://www.the-girl-who-ate-everything.com/2009/07/jello-pretzel-salad.html but ya'll know I changed it a bit :)
Another Thing I Love
A few months ago I put a posting on here about a box of bread that I bought. We really liked it so I figured I would let you guys all know that it passed our taste-bud test! Then I've made a couple of recipes with Philadelphia cooking creme's that we really like too. So, now for a new product we have recently fallen in love with...
It's poblano alfredo sauce. If you guys don't like peppers its okay because these "poblano" peppers taste so much like basic table pepper. Yup, like salt and pepper, pepper. Its super mild, but oh so delicious. Both kids loved it too. I bought it and while making dinner I was looking at the package going "um, not too sure about this." Once we were finished making it and took our first bites, wow. It is so yummy! So, go get yourself some and fall in love! (We made it into a blackened chicken pasta by pan frying up some chicken pieces that were in a basic blackening spice that I googled up. Took only a few seconds to do it. Then I made some noodles, heated up the sauce, threw it all together and voila. Dinner was served!)
Tuesday, November 15, 2011
Crock Pot Potato Soup
I found this recipe on pinterest.com the other day and had to make it! Actually...I lied. Nick found it on pinterest and requested that I make it. :) I am so glad I did though because it was so yummy! While it was cooking I smelled so much garlic and kept thinking "this can't be good." I was amazed though, it wasn't overly garlicy to taste! It was...well...perfect! I also thawed some bacon out of the freezer (okay, another lie...I actually put it in the microwave to dethaw it because I forgot to de-freeze it...) and cooked it up at the end to top the soup. PERFECT! (To cook microwave fast, and mess free put about 6-7 paper towels on a microwave safe plate. Put your bacon strips on it. Now cover them up with another 1-2 paper towel sheets. Put in the microwave for 8-12 minutes. They will cook a little once the microwave stops too. SUPER crunchy, best used to top soups and such. Not the best way to cook if you are wanting to eat it plain).
Ingredients:
5 lbs Russet potatoes (washed, with skins on)
3/4 of an onion, diced into tiny pieces
4 large garlic cloves, diced really really small
6 Cups chicken broth (1 of the big containers)
2 teaspoons salt
Pepper to taste
Directions:
*Dice up your potatoes into small bites (about 1/2 inch pieces). (Look at the very bottom of this blog post to see how many potatoes and the size's I used for a good estimate...I think I used a little less than 5 pounds because they wouldn't all fit into my crockpot!)
*Spray down your crockpot with baking spray.
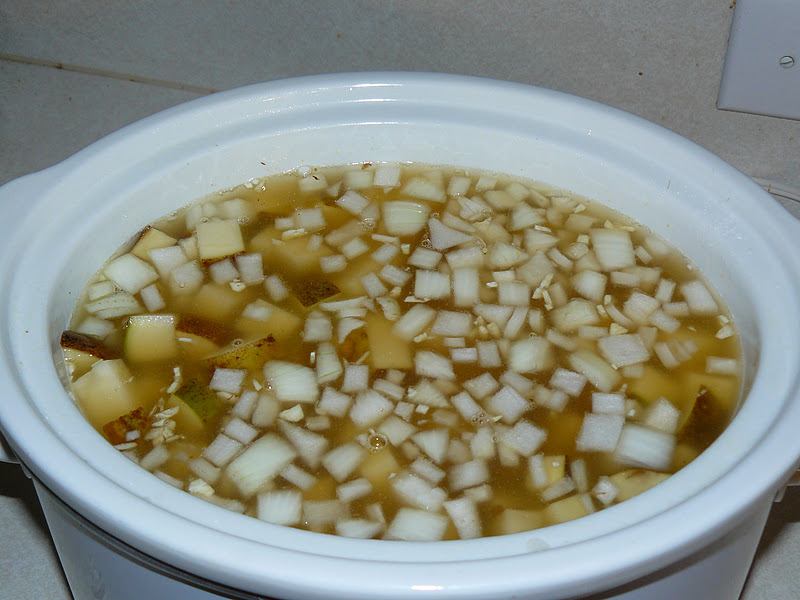
*Put all of the potato pieces into the crockpot.
*Add your garlic pieces and onion pieces into the crockpot.
*This is the big chicken broth I used in the next step:
*Pour your chicken broth over the potato mixture. No need to mix since the onions will float once they start to cook. But if you are like me you will have to stir it regardless, sigh*
*Sprinkle the salt over the mixture.
*Cover your crockpot and turn cook on HIGH for 6 hours, or low for 10 hours. I did the 6 hour one...
*After the 6 or 10 hours, remove half of the potato/onions from the crockpot and put it into a blender with 2 packages of cream cheese. I had to do 1 package of cream cheese with 1/4 the potatoes, then a second batch in the blender with the second block of cream cheese.
*Pour it back into the crockpot and mix well.
NOTE: Originally I scooped out a bunch of the liquid because I thought "this is going to be a sloppy, overly liquidy soup. If you want to you can do this too...BUT, I eventually poured every single drop of the liquid back in and it was the perfect consistency! hah!
*Mix it up well, stir in pepper to taste, and serve with your favorite toppings!
Here is the sized potatoes I used. BUT please note that I didn't have enough room in my crockpot for the top 3 in the lefthand corner...So I used all the others except for those 3. So I used 6 big, 1 small/medium for the soup.
I adapted my recipe from the one found here: http://www.mamalovesfood.com/2009/06/baked-potato-soup-slow-cooker-style.html
(her's didn't dice up the garlic cloves until the end and I used 2 cups less broth than she did. Also, I used less salt and only 3/4 of an onion.)
Ingredients:
5 lbs Russet potatoes (washed, with skins on)
3/4 of an onion, diced into tiny pieces
4 large garlic cloves, diced really really small
6 Cups chicken broth (1 of the big containers)
2 teaspoons salt
Pepper to taste
Directions:
*Dice up your potatoes into small bites (about 1/2 inch pieces). (Look at the very bottom of this blog post to see how many potatoes and the size's I used for a good estimate...I think I used a little less than 5 pounds because they wouldn't all fit into my crockpot!)
*Spray down your crockpot with baking spray.
*Put all of the potato pieces into the crockpot.
*Add your garlic pieces and onion pieces into the crockpot.
*This is the big chicken broth I used in the next step:
*Pour your chicken broth over the potato mixture. No need to mix since the onions will float once they start to cook. But if you are like me you will have to stir it regardless, sigh*
*Sprinkle the salt over the mixture.
*Cover your crockpot and turn cook on HIGH for 6 hours, or low for 10 hours. I did the 6 hour one...
*After the 6 or 10 hours, remove half of the potato/onions from the crockpot and put it into a blender with 2 packages of cream cheese. I had to do 1 package of cream cheese with 1/4 the potatoes, then a second batch in the blender with the second block of cream cheese.
*Pour it back into the crockpot and mix well.
NOTE: Originally I scooped out a bunch of the liquid because I thought "this is going to be a sloppy, overly liquidy soup. If you want to you can do this too...BUT, I eventually poured every single drop of the liquid back in and it was the perfect consistency! hah!
*Mix it up well, stir in pepper to taste, and serve with your favorite toppings!
Here is the sized potatoes I used. BUT please note that I didn't have enough room in my crockpot for the top 3 in the lefthand corner...So I used all the others except for those 3. So I used 6 big, 1 small/medium for the soup.
I adapted my recipe from the one found here: http://www.mamalovesfood.com/2009/06/baked-potato-soup-slow-cooker-style.html
(her's didn't dice up the garlic cloves until the end and I used 2 cups less broth than she did. Also, I used less salt and only 3/4 of an onion.)
Wednesday, November 9, 2011
Crockpot BBQ Pineapple Chicken
I have been obsessed with pinterest.com lately. Recipes galore! Its not only a recipe website, but I've found tons of them on there. Anyways, I saw this one and made it the next day. It was so delicious! It cost me less than $7.00 to make it also! I served it for Nick on a roll, as a sandwich. For myself, I served it on white rice. Both were awesome!
Ingredients:
4-6 Chicken breasts (I used 5 small ones)
1 LARGE can of crushed pineapple, undrained
1 Container of honey bbq sauce
Directions:
*Spray your crockpot with baking spray.
*Put your pineapples and bbq sauce into the crockpot and mix well.
*Place your chicken breasts into the crockpot and cover with the sauce.
*Cover and cook on low for 6 hours of high for 3 - 3 1/2.
Ingredients:
4-6 Chicken breasts (I used 5 small ones)
1 LARGE can of crushed pineapple, undrained
1 Container of honey bbq sauce
Directions:
*Spray your crockpot with baking spray.
*Put your pineapples and bbq sauce into the crockpot and mix well.
*Place your chicken breasts into the crockpot and cover with the sauce.
*Cover and cook on low for 6 hours of high for 3 - 3 1/2.
Subscribe to:
Posts (Atom)